One benefit of choosing WP Engine for your hosting provider is the ability to use Git. What is Git? In a nutshell, it is a version control system allowing you to track changes made to computer files and jump back and forth between those changes.
This post will provide step-by-step instructions to configure and use WP Engine’s Git feature, Git Push.
Is This Tutorial For You?
I have written this tutorial for those who intend to access and develop an already versioned install in WP Engine. For example, you are a developer asked to work on a site hosted by WP Engine and you need to push your changes afterward. There is already an install; you just need to authenticate yourself with WP Engine, clone the repository, make changes, and upload those changes via Git Push.
Also, this tutorial assumes you have a basic understanding of Git. If not, it can be learned fairly quickly. There are countless free tutorials to be found online. Here’s a solid Git tutorial.
Using Git Push With WP Engine
So without delay, let’s look at how to use Git Push with WP Engine.
1. First, an SSH Key
Your public SSH key is used to authenticate yourself with the Git server. You’ll need to generate a key unless you already have one. There is an easy way to check:
Open your terminal and enter
cd ~/.ssh
ls
If you already have an SSH key, you will see a file named either id_dsa or id_rsa. Also, you will see one with a similar name but with the extension .pub. This is your public SSH key and the one you will be using to authenticate with WP Engine.
If you do not have an SSH key, you will need to generate one. Open your terminal and run the command:
ssh keygen
You will see something like this:
$ ssh-keygen
Generating public/private rsa key pair.
Enter file in which to save the key (/home/compname/.ssh/id_rsa):
Created directory '/home/yourname/.ssh'.
Enter passphrase (empty for no passphrase):
Enter same passphrase again:
Your identification has been saved in /home/compname/.ssh/id_rsa.
Your public key has been saved in /home/compname/.ssh/id_rsa.pub.
The key fingerprint is:
(SSH fingerprint) [email protected]
The text displays the location of your keys and provides you an option to enter a passphrase.
The point of interest here is the public key.
2. Submit Your Public Key To WP Engine
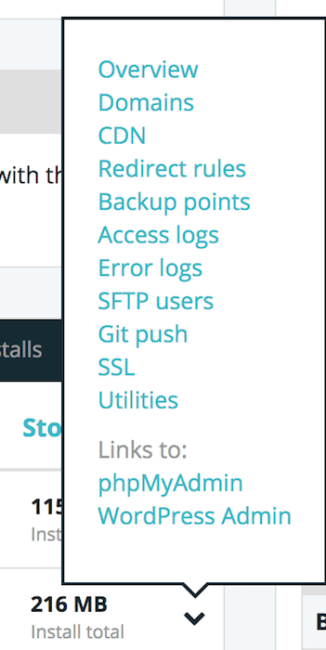
Go to https://my.wpengine.com/. From there you will see a list of your installs. From the desired install, click on the drop-down arrow and choose Git Push.

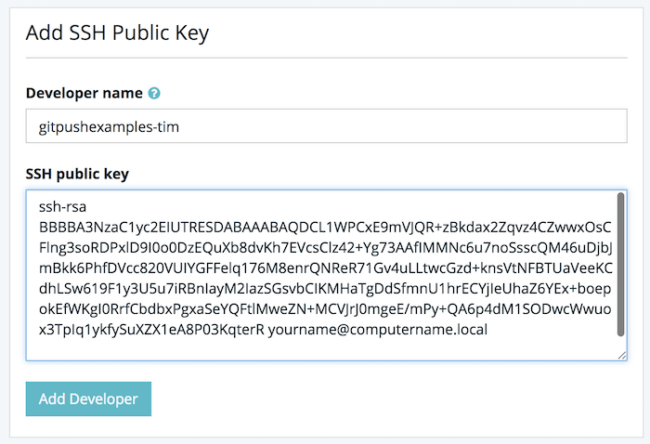
Create your Developer Name and paste in your SSH public key. This can be obtained easily from the terminal by populating your key and copying it to your clipboard. So based on our example above, we would input:
pbcopy < ~/.ssh/id_rsa.pub
Go to your SSH Public Key box and paste in the copied key.

Now click Add Developer.
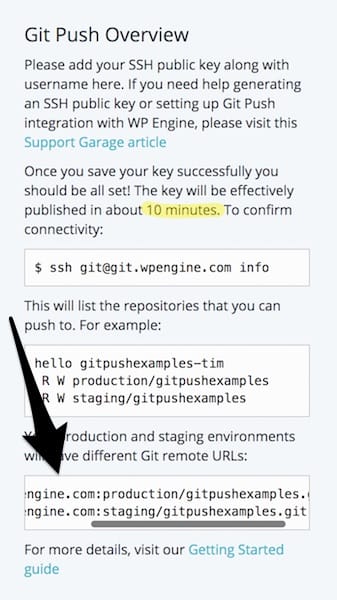
The “Git Push Overview” section in the right column informs you WP Engine will publish your key in about 10 minutes.
3. Access Your Repositories
Wait 10 minutes and then type the following in your terminal
ssh [email protected] info
This command displays a list of all of the repositories you can access. Your install should now be accessible. If this is your first time connecting to WP Engine’s Git, you will be asked to authenticate. According to WP Engine’s documentation, you will see the following:
ssh [email protected] info
The authenticity of host 'git.wpengine.com' can't be established.
RSA key fingerprint is 19:17:ee:d2:1d:8d:c9:3e:dc:3e:0d:21:a7:c6:52:fc.
Are you sure you want to continue connecting (yes/no)? yes
Warning: Permanently added 'git.wpengine.com,' (RSA) to the list of known hosts.
Be sure that the host fingerprint matches one of the following. If not, do not continue.
RSA 19:17:ee:d2:1d:8d:c9:3e:dc:3e:0d:21:a7:c6:52:fc
ECDSA 0c:4b:07:92:dd:e0:be:50:90:7d:0d:c3:30:56:fa:9a
ECDSA SHA256 Jgp8bPftGbM0rzQaeA7KTBrZa1UfEN1nqQMLIwu5i18
4. Using Git Push
*If you have not set up a remote repository on WP Engine’s server, please check their Git documentation.”
Git clone
In our situation, which is that we wish to access a remote repository (previously established), we will clone the current repo so that we can access and edit a copy of the files on our local computer.
On our install screen, there is a column to the right called “Git Push Overview.”

At the bottom, you will see the direct links to this install. To clone the repository, create a folder for your project, navigate to it, and insert the command “git clone” before the corresponding remote URL.
For instance, if the production URL is [email protected]:production/gitpushexamples.git you would enter:
git clone [email protected]:production/gitpushexamples.git
This command will download the current repository to your local computer. To clone the staging repository, use that URL instead.
Git push
After we have made our changes (and added them, and committed them locally), we’ll use the Git Push command to upload them to our remote install. To verify where we will be pushing the files, we enter the following into our terminal:
git remote -v
This command will display something like this:
origin [email protected]:production/gitpushexamples.git (fetch)
origin [email protected]:production/gitpushexamples.git (push)
What is important (aside from the fact that I am on the production remove) is that word “origin.” You may see something like “production.”
Here is the formula to push: git push (remote name for WP Engine) master. Thus, to push my changes, I enter the following in my terminal:
git push origin master
The command is git push. The remote name is origin. The branch is master.
Conclusion
And that is it. At this point, you can use WP Engine’s Git Push like any other remote Git repository (GitHub, Bitbucket, etc.) to pull, create branches, and accomplish other version control tasks.
If you enjoy Git and are working with WP Engine, give the Git Push feature a shot. After traversing a small learning curve, you will find it easy to manage Git Push with WP Engine and can incorporate it into your daily workflow. If you’d like hands on help with your project, our WordPress optimization experts are ready to help.

